|
The ERE#7 consist:
Fully machined LT1 block
Internally balanced rotating assembly
Callies Dragonslayer 3.75" stroke crank
JE/SRP Pistons/pins/rings/locks
(1.285" CH with 16cc dish)
Manley Sportsman 5.850" rods
Premium main/rod/cam bearings
Eagle splayed main caps
ARP main studs
Titan Gerotor Oil Pump
Stef's Oil Pan
Pocket ported LT1 Alum. heads
(1.94" int. valves, 1.55" LT4 exh. valves)
GMPP 1.6 ratio roller rockers
GM hydraulic roller lifters
Trick Flow pushrods
LT4 timing set with water pump gear
All gaskets/seals
GMPP/Proform valve covers
Used ATI 153 tooth SFI 29.1 Flexplate
Used GM LT4 hub and damper
used timing cover, rear main seal.
[The LT1 block, intake manifold, oil pan, timing
cover, ATI flexplate, LT4 hub, damper and rear main seal housing are the only
used/reconditioned parts. All other parts are brand new].

The Callies 3.750" stroke crank is custom ordered to fit
5.850" rods. All Dragonslayer cranks are 4340 forged
steel, heat treated and lightened at #1 and #4 rod throws.

Manley Sportsman 5.850" I-beam rods. If you click on the photo you'll
see the factory tech weight details.

8-1-06: This was the block assigned to ERE7 but it has some
HardBlok at the bottom of the cylinders and we decided that the
knock sensors will be either too sensitive or less-sensitive because
of that. Instead I sent a block to the machine shop that I got
from Combination Motorsports. It will get a bore/hone to
4.0305, (an extra .0005" for the piston coating).
Eagle splayed caps will be machined to fit on the ERE7
block. This is not a photo of ERE7 but of a block with filler
in it, (filler is good for a race motor).

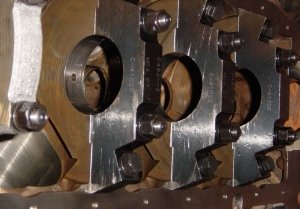
Here you can see the valve job and pocket porting. The
intake valve is 1.94" diameter and the exhaust valve is the
famous LT4 hollow stem, sodium filled for cooling, 1.55"
diameter. The exhaust runner is fully ported and the intake
runner is ported at the entrance and the pocket.

The famous GM846 cam. This is made by Crane Cams for
GM. The quality of Crane Cams is unsurpassed in the
industry. The cam comes with the correct dowel pin length and
high quality metallurgy for long lobe life and oil pump gear wear
resistance. .509/.528" lift with 1.5 rockers and 222/230
duration at .050" with 107 ATDC deg. intake centerline (112
lobe centerline angle). Direct from Dal Slabaugh for $252 bucks.
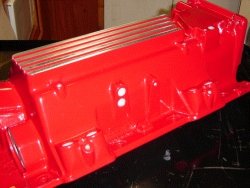

The redder-than-red Noble Powder Coated LT1 intake. My camera
did not catch the true red of this intake. It's darker than
shown.
Update
8-10-06:
More ASSEMBLY OF ERE#7

I'm still using plastigauge but I have micrometers and dial bore
gauges too. Rods with cap screws are hard to measure with
plastigauge so I measured a few with the mic and dial bore
gauge. Here the rod with bearing is ZERO on the bore gauge.

ZERO on the bore gauge mics out to be 2.1013"

The rod journals mic to be 2.1000 (sometimes 2.0999).
For this rod that gives a 0.0013" clearance.

The Manley rods have 3/8" ARP cap screws that require
.005" stretch. 60ft-lb with moly lube gives just that.

Every piston measured .008" out of the hole
An LT4 timing set. (the chain is typically loose)

Degreed the GM846 cam. It was D.N.O. with intake max lift at
107deg ATDC.

Crank key was ground to allow for LT1 hub but it is not enough key
for the 96' reluctor. I pulled the sprocket and put a new
crank key in that gave more of a nub for the reluctor.

One head is on and then I ran out of camera battery.
UPDATE 8-19-06

Pulling the crank hub in order to change the timing gear set.
The LT4 timing set is too loose so after a talk with Wayne at Cloyes
I found out that stock LT4 timing sets are no longer produced.
I purchased an oversized stock crank sprocket and Allen and I
decided that the stock timing set will work fine. The crank
sprocket #S505 is supposed to be billet steel instead of powdered
metal which is cool.

Here is a fuzzy photo of the '96 crank reluctor.

I pay extra to have Brinkley Auto Machine tap the front oil galleys
for threaded plugs

Here is the Cloyes gear.

Gear on crank.

Used stock cam sprocket and used chain. Waiting for new chain.
Will re-degree the cam after new chain arrives.
Update
10-23-06:
INSPECTION OF ERE#7

After years of R&R practice I can get a motor on the hook in an
honest 2 hours, (taking my time).

Sliding out nicely. Usually I forget a wire or two. Not
this time.

I like to preach my left side header trick. Install and pull
the motor with the headers ON. This save time and is very easy
to do.
By the way, those G-Hann headers have served well for over 6
years. The coating is from Jet-Hot and is still in pretty good
shape at the top of the pipes. My CIA headers on the other
hand were 100% rust in 2 weeks of service. Performance
Coatings Inc. (which Dan uses) in a word, SUCK.

Now I'll look at the spark plugs and some main and rod bearings and
paint the block. Man that thing got rusty in just one month in
my car.

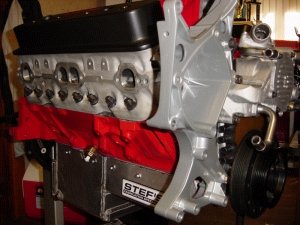
Here is another view. The damper and under-drive pulley is
from Gerry Charlesworth. The alternator bracket is sorta my
own hodge-podge.

More posing. Lots of block rust. I thought that I would
not paint the block before testing in my car just in case I
scratched it. Well, I should have painted it.

No oil in the exhaust ports. That is nice to see. My
tune is a bit on the rich side, (especially at idle), so there are
signs of a rich tune-up.

And the other side.


The spark plugs look fine. I'm looking for oil fouling.

Going to look at the bottom end.

Immediately after taking the oil pan off. Looks very good in
here. It's had the oil changed 3 times and all the moly and
assembly goop has been flushed out with the 1st and 2nd oil change,
(actually the 2nd oil change drain oil looked excellent).

Rod bearings look better then I expected. These bearings have
a thin coating and I thought that some of that might be worn
off. Nope.

#1 and #2 mains. Perfect.

Left side head off. Rich tune up, (sticky gas on pistons), but
the cylinders look like they have a very good ring seal. It
certainly seemed that way on the street.

Here is why I took a head off. I broke a valve cover bolt off
in the head. This head will go to the machine shop to get that
out.
|
Component
Description:
each photo links to full size view

GMPP 1.6 Roller Rockers, LT1 aluminum heads, assorted gaskets
and hidden behind the heads you might see the LT4 timing set.

The good stuff. Callies Dragonslayer, Manley Sportsman rods,
JE/SRP Pistons, pin, rings, spiro-locks

JE/SRP piston #146997 with JE file fit rings, pins and locks.
The pistons weight 435g and are coated with a high tech moly dry
film by Specialized Powder Coatings, Huntington Beach, CA. The
16cc dish makes for a street friendly compression ratio,
(11.0:1). The skirt coating reduces friction and heat.

The Manley 5.850" rods #14116-8 are superbly finished at the
factory by matching all big ends and small ends. The big ends
weigh 591g and the pin ends are 164g. The rods are fitted with
ARP 8740 7/16" cap screws.

LT1 alloy cylinder heads. They have a competition valve job
with pocket porting and mild runner work. I like the LT4
hollow stem/sodium filled exhaust valves. The intake valves
are 1.94" diameter stainless steel by SBI #01762R8. Right
now the valve springs are
installed to match the Crane 227 cam card, (1.850" install
height at 130lb). They might have to be changed if a different
cam is selected.

I verified the combustion chamber volume and came up with
54cc. I did not mockup the rotating assembly in the block yet
to verify deck height but it should be at zero deck height. With the 16cc dished piston,
54cc combustion chamber, 3.75" stroke, 4.100 gasket bore,
.039" FelPro head gasket, the static compression ratio would be 11.0:1
and quench would be at .039".

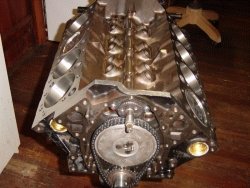
ERE7 is a complete engine from oil pan to valve cover.
Here are the valve covers, GMPP/Proform black painted.

The owner decided to get a Stef's oil pan and Titan Gerotor oil
pump. His pan and pump will go on order 6-30-06. Here is
an example photo from ERE4.
Update
8-9-06:
ASSEMBLY OF ERE#7

High quality cam bearings ready for install

I have a cam bearing install tool so I don't have to pay the machine
shop to do it.

The main bearings have some sort of high tech coating.

The Callies Crankshaft sets into the block for the 1st time.
The crank is one of the best.

Lots of ARP molly lube on all the fasteners. Main bearing
clearance was checked and found to be .002" at all caps,
(1,2,3,4,5)
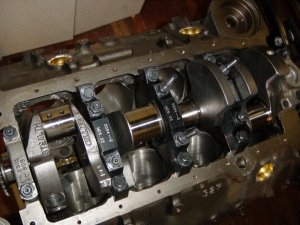
Eagle splayed caps with ARP main studs, (except the windage tray
studs are from Milodon).

File fit of JE piston rings, (.022 1st ring, .026 2nd and oil rails
verified at least .015")

Assembly of pins, pistons and Manley rods.

Spirolocks are my favorite. Easy to install.

1st piston in. After installing all 8 I checked piston deck
height and it's .008" out of the hole for all 8 pistons.
UPDATE 8-15-05

Swapped the standard keeper (R) with -.050" keeper
(L). Now the valves are installed at 1.850"

GMPP 1.6 ratio roller rockers installed and preload at 1/2 turn.
9-20-06:
Install to my DGGM for testing and qualifying

Sweet looking motor.
It will be painted bright red after testing.

On the motor mounts.


A close up of Gerry Charlesworth's underdrive pulley system.
It's very well engineered.

9-21-06: Install completed.
Update
10-31-06:
Ready for Delivery

This is as true as I can get for color. No flash helps show
the stunning powder coat of Bob Noble.

The engine paint is Dupli-Color 500F Engine Enamel Chevy
Red-Orange. It turned out to be too orange. I went over
it with "gasp" Ford Red and it's still a bit too
orange. Sorry Allen.
Bob Noble also powder coated the accessory bracket.
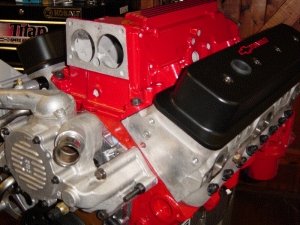
Here is another angle.

Final paint at the rear, 11-1-06. The motor is going to Allen
on 11-3-06 via my truck and the SSHS6.

Flexplate on and torqued. In this light the engine paint looks
mostly red but it's a red/orange no matter how many coats of Ford
red I put on.

Nice light and nice pose. The accessory bracket is spaced out
using Gerry Charlesworth spacers. The bracket is powder coated
silver/gray.

More good light for posing. . . .
|


